Murukku ~ Indian Cooking Challenge September 2009


This month's challenge is murukku. This is not the first time I am making this. I have already made murukku using rice flour and besan. That, we call as magizhampoo.

This recipe makes use of rice flour and urad dhall flour and we call this as thenguzhal.

Before I started cooking, I used to think making murukku needs lot of skill and practice. I have not even seen some one making it and had no idea about the procedure.

After coming here to US, chances of getting good quality snacks is less, rather zero and only then, I decided to invest in a murukku press. I was quite hesitant to try making it. But to my surprise, the result was awesome. I got perfect, oil free, melt-in-the-mouth murukkus in the very first attempt. I even managed to send a pack of them to one of my friends in a different state.

This time, I followed the exact recipe as given by Srivalli and was a great success.

Preparation time - 20 to 30 mins
Cooking time - 20 to 30 mins
makes: approximately 250g of murukku
Cuisine: Andhra & Tamil Nadu
Utensils needed:
Muruku/ chakli press
Kadai

Ingredients needed:
Raw Rice 4 cups
urad dhal 1 cup
Water app 1/2 cup or more

For seasoning:
Cumin seeds - 1 tsp
Sesame seeds - 1 tsp
Hing - 1/2 tsp
Salt to taste
Butter - 75 g

Method to prepare:

Wash and drain the rice. Shade dry the Rice for 1/2 hr. Dry roast the Urad dal to light brown. Allow it to cool.

If you are using more quantity, you can get it ground in rice mil, else use your mixie to grind both Rice and Urad dal.

First grind rice into a fine flour, keep it aside. then grind the urad dal to fine powder.

In a wide vessel, take both the flours along with salt. Mix well. Add cumin, Sesame seeds to the flour, mix well.

Whether you use Asafetida powder or the solid ones, you got to mix it in water, make sure it is dissolved before adding to the flour. If its not dissolved properly, when deep frying the muruku, there are chances for the hing to burst our due to air bubbles.

Mix in the hing to the flour and finally add the butter. Gather everything well and you will get more of a crumbling mixture. Now slowly add water and knead a dough which is little more softer than the puri dough.

Heat a kadai with oil enough to deep fry. Once the oil is hot enough, simmer to low flame.
Take the Muruku Aachu, wash and wipe it clean. Then divide the dough into equal balls. Fill the Muruku maker with the dough. You can either press it directly over the flames or press over a paper and gently slide it down the hot oil. But since the quantity mentioned here is less, you can press it directly over the kadai.

Cook over medium flame, using a slotted spoon, turn it over to other side to ensure both sides turn golden colour. You will know by seeing the colour that its cooked. Remove to a kitchen paper and store it in a air tight container.


This normally stays good for weeks, provided you forget about these which hardly happens!


Notes:

Things to remember for not making your muruku break into pieces. Its important to roast the Urad dal to just brown and not very brown.
Rice used should have some starch to hold the shape, else it might crumble down.
Adding too much butter can also result in the fried murukus to break. You can start with half and slowly increase by feel the dough. The dough with the right amount of butter, will be soft but not very soft.
If you don't have a muruku aachu, you can use a plastic cover/ ziplock cover with thin hole to press out the dough or even icing bags with different heads can be thought of.
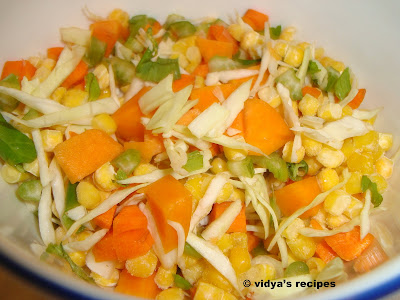
Sweet Corn Mushroom Soup

One more heart warming soup from my kitchen!

I have combined 4 colors of vegetables and protein packed, low calorie mushrooms in my soup. Don't ask me why I added yellow pumpkin to this soup. Yeah, there is a Thai special yellow pumpkin soup but this method is totally different. I was on a look out for vegetables to add to my healthy soup and that is when I saw the yellow pumpkin sitting in the comforts of my fridge, (yeah! It's damn hot outside and I don't have an ac for myself) staring at me. So added a piece of it too.

Generally, it is good to include as many colors in your diet err.. I mean different colored vegetables and not a pack of gems. I have already spoken enough about goodness of vegetables and my fervor for them. This time around, I reduced the amount of butter and milk making the soup totally healthy. I should admit, this is the best of all soups I have made till date.

Ingredients:

Mix of vegetables - I used carrot, beans, cabbage, celery, sweet corn,yellow pumpkin, Used 4 diff colored vegetables)- 1 cup
Green Chillies - 2
Mushroom - half a cup
Corn flour - 1 tablespoon
Milk - half a cup
Butter - 2 tsp
Ghee - 1 tsp
Salt & pepper to taste


Method:
1. Pressure cook the vegetables and green chillies with water.
2. Cook the mushrooms separately (just sprinkle a little water and cook in a open pan till all water from mushroom oozes out). Add the ghee and fry the mushrooms crisp. Set aside.
3. Extract the veg stock from the cooked vegetables and extract the pulp using a soup extractor. Since I do not have one, I just put them in a blender and made a paste.
4. Heat butter in a pan, fry the corn flour till golden yellow. Add milk and cook till it forms a paste. (You can skip this if you do not want to have butter and milk)
5. Add the veg stock and pulp. Add more water depending on the consistency. Add salt and bring it to a boil.
6. Add the fried mushrooms to the soup and serve hot with salt & pepper.

Kwik Fix Series # 7 - Lemon Rice


Next recipe that gets to feature in my kwik fix series is Lemon Rice. It is so basic for a South Indian that I can hear some of you exclaiming "huh! recipe for lemon rice!". It is such an easy breezy recipe and I would like to post it in my space for the benefit of those who have not heard of it , so far. If you perform a survey on South Indian lunch boxes on any given day, I am positive that every alternate box would carry lemon rice. Okay! If not 50% at least 25%; trust me. As a child, I was always thrilled to carry this with potato fry.

If you have leftover rice, you can make this in a jiffy. Season the rice and squeeze in some lemon juice, you are ready to go!

Though I call it a simple recipe, I feel it needs utmost perfection. I don't like my rice oily or with a dark yellow color. I have added minimal oil, just right amount of turmeric for the perfect bright yellow color and as an end result got a juicy lemon rice. Perfect for lunch boxes!

Ingredients:
Cooked rice - 1 cup (Bring down the rice to room temperature, spread the rice without sticking to each other)
Green chillies - 2 medium chopped
Curry leaves - 5
Mustard - 2 tsp
Channa dhal - 1 tsp
Urad dhal - 1 tsp
Oil - 1 tsp
Turmeric powder - half to one tsp
Lemon - 1
Salt to taste
Hing a pinch

Method:

1) Take a small seasoning pan, heat the oil. Add hing, channa dhal, urad dhall and mustard. When the mustard pops, switch off the gas.
2) Remove the pan, add chillies, turmeric and curry leaves in that order. The heat in the pan is enough to cook the chillies.
3) Add salt to the rice and pour the seasoning. Mix well.
4) Squeeze in the lemon juice, without the seeds. Have a check on the amount of juice. If you are using a real juicy one, squeeze in half a lemon, taste once and then add more juice to taste.
5) Close the rice for half an hour for the juices to blend.
Serve with potato wafers or my fiery hot potato fry. Any spicy curry will go well with this rice.


Tip: You can add peanuts or cashews with the seasoning.

I have seen people making this in a different way. After seasoning, add the rice to the pan with the heat still on, mix well, switch off and then squeeze in the juice.

My Custom Domain

My own domain is up at http://www.vidyasrecipes.com
Since it takes time for this new address to be available all over the Internet, you can still get to my recipes at http://vidyasrecipes.blogspot.com.
My blog is in transition. Afterwards, readers will be automatically redirected to my new address.
Feels great!

Aloo Gobi Masala


Aloo Gobi - another lip smacking authentic Punjabi curry . Slurp! I am addicted to Punjabi Khaana as much I am to my very own south Indian delicacies. Every time I think about Indian food varieties, I am flabbergasted. I would best describe India as 'foodie's paradise'.

Aloo gobi would top my Punjabi favorites list. This is the first ever North Indian gravy I had, as far as I remember. Naan and Aloo Gobi would be my standard order, on our occasional restaurant visits, in early 90's. Those times, I used to be a fussy eater and I never had it in me to try paneer or mushroom. Not anymore! I never even wanted to try brinjal or Bindi in restaurants. Going all the way to a restaurant, I didn't want to try the usual vegetables that are used in south Indian cooking. Gobi was a rare, rather a no-no at our home then, fearing that it might contain worms. Well, it was actually true those days. Now a days I feel they are better; may be owing to the proper usage of pesticides. Hoping that they just make proper use!

The bottom line is gobi was, is and will be my favorite and I just am addicted to aloo gobi masala. Even now, If I have no clue what to order, I end up ordering this. So far, no restaurant has disappointed me.

If you have not tasted this yummy dish so far, please grab a plate and see for yourself, the greatness of it.
I have not added onions in my recipe. It's my personal choice and you can add sliced onions after seasoning with jeera. But, no tomatoes please for the authentic taste.

Ingredients:
1 medium cauliflower
3 medium potatoes
Turmeric powder - 1.5 tsp
Kashmiri chilli powder - 1.5 tsp (If you using red chilli powder, use slightly less quantity)
Dhaniya Powder - 2 tsp
Slit Green Chillies - 2 medium
Jeera - 2 tsp
Crushed ginger - a small piece
Amchur - 1 tsp
Chopped cilantro to garnish
Salt to taste
Oil - 1 tablespoon

Method:

1) Break the cauliflower and cut the florets into uniform medium sized pieces. The flowers should retain the shape on cooking. Peel the potatoes and cut them into cubes.
2) To the crushed ginger, add dhaniya powder, turmeric powder, chilli powder, a little water and mix everything well. This is to ensure uniform absorption of masala by the vegetables. If you add dry powders directly, it might stick to the florets unevenly.
3)Heat the oil, season with jeera. Add the green chillies. Then add the above mixture and wait for less than a minute till the oil separates.
4) Add the cauliflower and potatoes. Cover and cook till half done. (10 minutes on low to medium flame) Stir once carefully without breaking the florets. Add salt and cook till done.
5) Mix in the amchur powder and cook for a min.


Switch off and garnish with cilantro. Serve hot with rotis / pulav varieties. This time, I served with mushroom pulav.


Tip:In step 4, instead of adding raw potatoes and cauliflower, you can fry each of them separately till light/golden brown in a separate pan before hand and add it. This gives a better taste.

Baked Brinjal Chutney

This baked or smoked brinjal(eggplant) thogaiyal (chutney) is an heirloom recipe. This is a south Indian version of Baingan ka Bhartha in the sense that both the dishes have smoked brinjal as base. Makes a great meal when mixed with hot rice , sesame oil and served with papad. This can also be served as a side-dish for idli/dosa

Ingredients:

1 big eggplant
Urad dhall - 1 table spoon
Red chillies - 3 medium
Tamarind - lime size ball
Salt to taste
Oil - 3 tsp
Mustard - 2 tsp
Hing a pinch


Method:
1. Polish the brinjal with sesame oil. Bake the brinjal at 400 degrees for 20 min. Turn the brinjal upside down in between for even cooking. Check if the brinjal is cooked thorougly with the skin easy to peel off and place in cold water. If not, cook for some more time. The cooking time might vary with size of brinjal.
Alternately, cook on low flame till done with the help of tongs, if you do not have an oven.

2. Meanwhile, heat a tsp of oil and fry urad dhall till light brown. Add tamarind and red chillies. Fry everything till the dhall turns golden brown and chillis turn crisp. Lastly, add hing. Allow to cool.
3. Peel off the skin of brinjal and break roughly into pieces. Wait till it cools down. Grind together with the ingredients in point 2 and salt into a smooth paste.
4. Season with mustard,hing and urad dhall. You can even heat a little oil and fry the chutney till oil separates for better taste and shelf life.


Idly Manchurian ~ Fried Idly


This recipe has been residing in my drafts for a long time now; finally getting down to post it. Took a little break from blogging. I made this for dinner with the leftover breakfast idlis. I have tasted this in several restaurants at Chennai and completely love this. It has different names in different restaurants ; to name a few - idly manchurian, fried idly, kaima idly, chilly idly. I had some colourful bell peppers sitting in my fridge and wanted to use it in a manchurian. So combined everything with the leftover idlis, added a little of each masala and came up with this yummy dish in minutes.
I didn't want to deep fry the idlis. So resorted to shallow frying and saved oil. But you need lot of patience to fry them thoroughly.

Ingredients:
Idlis - 4 to 6 (medium size)
Bell peppers (diff colors) - a little of each amounting to half a cup
Slit Green Chillies - 2
Red chilli powder - 1 tsp
Idly chilli powder (optional) - half to 1 tsp
Onions - 1 small cut into cubes
Oil to fry (I did shallow frying. so 1 to 2 tablespoon is enough)
salt to taste
Cilantro to garnish

Method:
1) Cut the idlis into small pieces and fry till golden brown in oil. I did shallow frying which requires patience. You should fry all sides. If you want it quick, do deep frying.Set the fried idlis aside in a paper towel for the oil to drain.
2)Add a little oil and fry the onions, green chillies. Then add the bell peppers and fry.
3)Add chilli powder,idly chilli powder and salt, sprinkle a little water and cook well.
4)Mix the fried idlis and fry everything together for a min.
5)Garnish with cilantro and serve with curd or onion raitha.

Variation: You can mix boiled channa or other veggies like carrot,peas.

Award and a tag!

Thanks Latha, for passing this award to me. I am really sorry for this delayed post. Had to catch up with lot of other things and couldn't log in to the blogger. So nice of you. I am really amazed by the pace you post your entries.

This award comes with the following rules:
I must thank the person who gave me the award and list their blog and link it
I must list 10 honest things about myself
I must put a copy of The Honest Scrap Logo on my blog.I must select at least 7 other worthy bloggers & list their links
I must notify the bloggers of the award and hopefully they will follow the above three requirements also.


10 Honest things about me:
1. I love to compliment people a lot. I believe, that means a lot to them and that gives us a sense of satisfaction. I really hate few people who try to discourage others. My policy is 'If you can't do something nice, better be quiet.'
2. I love filter coffee.
3. Reading books & listening to good music are my fav pastimes.
4. I am a late riser. I hate getting up early.
5. A chatter-box. But some people turn me off and I can transform to the other extreme in their company. I prefer being quiet in such cases.
6. Till, I went to college, I used to be a fussy-eater. It is a total transformation from a fussy eater to a total foodie. I live to eat. But I don't eat too much of anything.
7. I love thrill rides. Well, life is the most exciting thrill ride.
8. Chennai holds a special place in my heart. I am crazy about the city.
9. I like solving puzzles and brain teasers.
10. My short term goal is to learn driving and long term goal, to run a business.

It's really difficult mentioning names and hence tagging all my blogger friends. Latha, please excuse me on that.

Tagged!

Sandhya of Sandhya's Kitchen has tagged me. I got busy over the long weekend and hence this post got delayed. Thanks Sandhya for tagging me. This tag is fun.

The Rules:
1. Link the person who tagged you.
2. Post the rules on your blog.
3. Share the ABCs of you.
4. Tag 4 people at the end of your post by linking to their blogs.
5. Let the 4 tagged people know that they have been tagged by leaving a comment on their website.
6. Do not tag the same person repeatedly but try to tag different people, so that there is a big network of bloggers doing this tag.

The Tag:
1. A – Available/Single? Married
2. B – Best friend? Love all my friends. Don't wanna mention names
3. C – Cake or Pie? Cake
4. D – Drink of choice? Filter coffee anyday
5. E – Essential item you use every day? Toothpaste & brush
6. F – Favorite color? All bright colors. I always go for good combination of colors rather than falling for a single favourite color.
7. G – Gummy Bears Or Worms? Nil
8. H – Hometown? Singara Chennai
9. I – Indulgence? Good food & a sound sleep
10. J – January or February? Jan & Feb :)
11. K – Kids & their names? No kids as of now
12. L – Life is incomplete without? finding your latent talent. Identifying and following your passion makes life worthwhile.
13. M – Marriage date? 6/6 (No date format confusion :D)
14. N – Number of siblings? One elder brother
15. O – Oranges or Apples? Both
16. P – Phobias/Fears? Fears
17. Q – Quote for today? It is your attitude and not your aptitude that decides your altitude.
18. R – Reason to smile? Do you need a reason to smile?
19. S – Season? Nature's work; so love all seasons.
20. T – Tag 4 People? Brinda,Chitra, Srivalli, Lubna (Many people have completed this tag already. Love all my blogger friends and tagging everyone who had not taken this before)
21. U – Unknown fact about me? I am a genius ;)
22. V – Vegetable you don't like ? Absolutely love all the vegetables. But should be cooked to my taste
23. W - Worst habit - Never accepting that I have one such habit;)
24. X – X-rays you've had? First one, for the elbow fracture I suffered in 5th std.
25. Y – Your favorite food? Anything cooked by me. Now, I call that ' self confidence'. I love any food that is cooked with love and care.
26. Z – Zodiac sign? Leo ;All my user ids are leovidya.

Have tagged 4 people. Check point 20

Kashi Halwa ~ Ashguord Halwa


Kashi phul in Hindi means Ashguord and hence the name. This is a famous dish in Tamil wedding feast. The authentic recipe calls for removing the water secreted from the pumpkin. To an extent that the grated pumpkin is tied tight in a cloth and the water extracted. I didn't want to remove the juice and decided to use it. The recipe doesn't require khoa too. I just added as a variation.
The halwa tasted awesome. But I have decided to omit khoa in my next attempt since I want to have the original taste of the vegetable. The halwa had both the flavours of pumpkin & khoa blended and it is up to you to decide how much khoa to add. Adjust the sugar content accordingly.
Also, use the food color sparingly. I am planning to omit even the colour next time since it is not so good for health. However, it is added in the authentic recipe.

Ingredients:

Grated Ashguord (white pumpkin) - 2 cups
Milk - half a cup
Unsweetened Khoa - 1 cup
Sugar - 1.5 cups
Ghee - 2 tablespoon
Saffron color - a pinch
Cardamom - 1 pinch
Cashewnuts to garnish

Method:
1) Grate the pumpkin and cook it along with milk. Traditionally, the water that the pumpkin oozes out is removed. But I decided to use it. Either pressure cook or simmer till the water and milk gets evoporated and the pumpkin becomes soft.
2) Add the sugar,khoa (updated) and mix well. Mix the color in a little milk or water and add it.
3) Add the cardomom powder and ghee. Stir till the halwa leaves the sides of the vessel and garnish with cashews fried in ghee.


Sending this to FIC - Zodiac signs at Ashwini's Spicy Cuisine. Food in Colour is an event started by Sunshine mom of Tongue Ticklers to emphasis the importance of colour in food.
My Zodiac is Leo and the Zodiac colour is orange/gold. Here, I present my food in orange colour to the event.


Update: Add the khoa in step 2. Missed it. Thanks Kals, for pointing out.

Chocolate Milk Shake


A sinfully delicious shake for the chocoholics. Though, I am not a great chocolate lover, there are days when I suddenly crave for chocolates. I don't generally eat chocolates frequently or on a regular basis. But, once I start eating it, I would pounce on it with full vigour and compensate for the choco-less days. This sinfully delicious shake is the outcome of one such choco craving. Generally, when I crave for something, I just go ahead and make it right away without even the slightest tinge of laziness. That's the only time, I can defy my laziness! How can I call myself a foodie, otherwise?
I tried and included as many things possible to make it rich & creamy. Forget about the calories and enjoy the drink. Here's a toast to all chocoholics out there!


Ingredients:
Milk - 2 cups
Sugar - 2 tsp
Condensed Milk - 2 tsp
Hersheys Chocolate Syrup - 2 to 3 tablespoons
Vanilla icecream - 1 scoop
Chocolate icecream - 3 scoops
Ice (optional)
Whipped cream and chocolate syrup to garnish

Method:
1.First run the milk, sugar, chocolate syrup and condensed milk in a processor/ juicer
2.Then add the ice cubes, 1 scoop of each icecream and blend again till thick and frothy.

Serving tip:
Add one scoop of chocolate icecream to a serving glass and pour the milk shake on top.
Garnish with whipped cream & choco syrup.Can also add choco chips or choco shavings. In that case omit the choco syrup. (just for garnishing)


Sending this to CFK- Chocolate event at Hema's salt to taste blog initiated by Sharmi of Neivedyam